The main activity that guilds are organized around is raiding. Your guild works together to defeat a Rancor.
How it works
The Guild leader or a guild officer launches the raid; there are seven tiers of difficulty, in which the enemies have progressively better stats and higher health
(Tier 7 is a little bit different than the others.)
A raid can only be attacked by characters with a star rating at least as high as the Tier of the raid
(a Tier V raid requires Tier V characters)
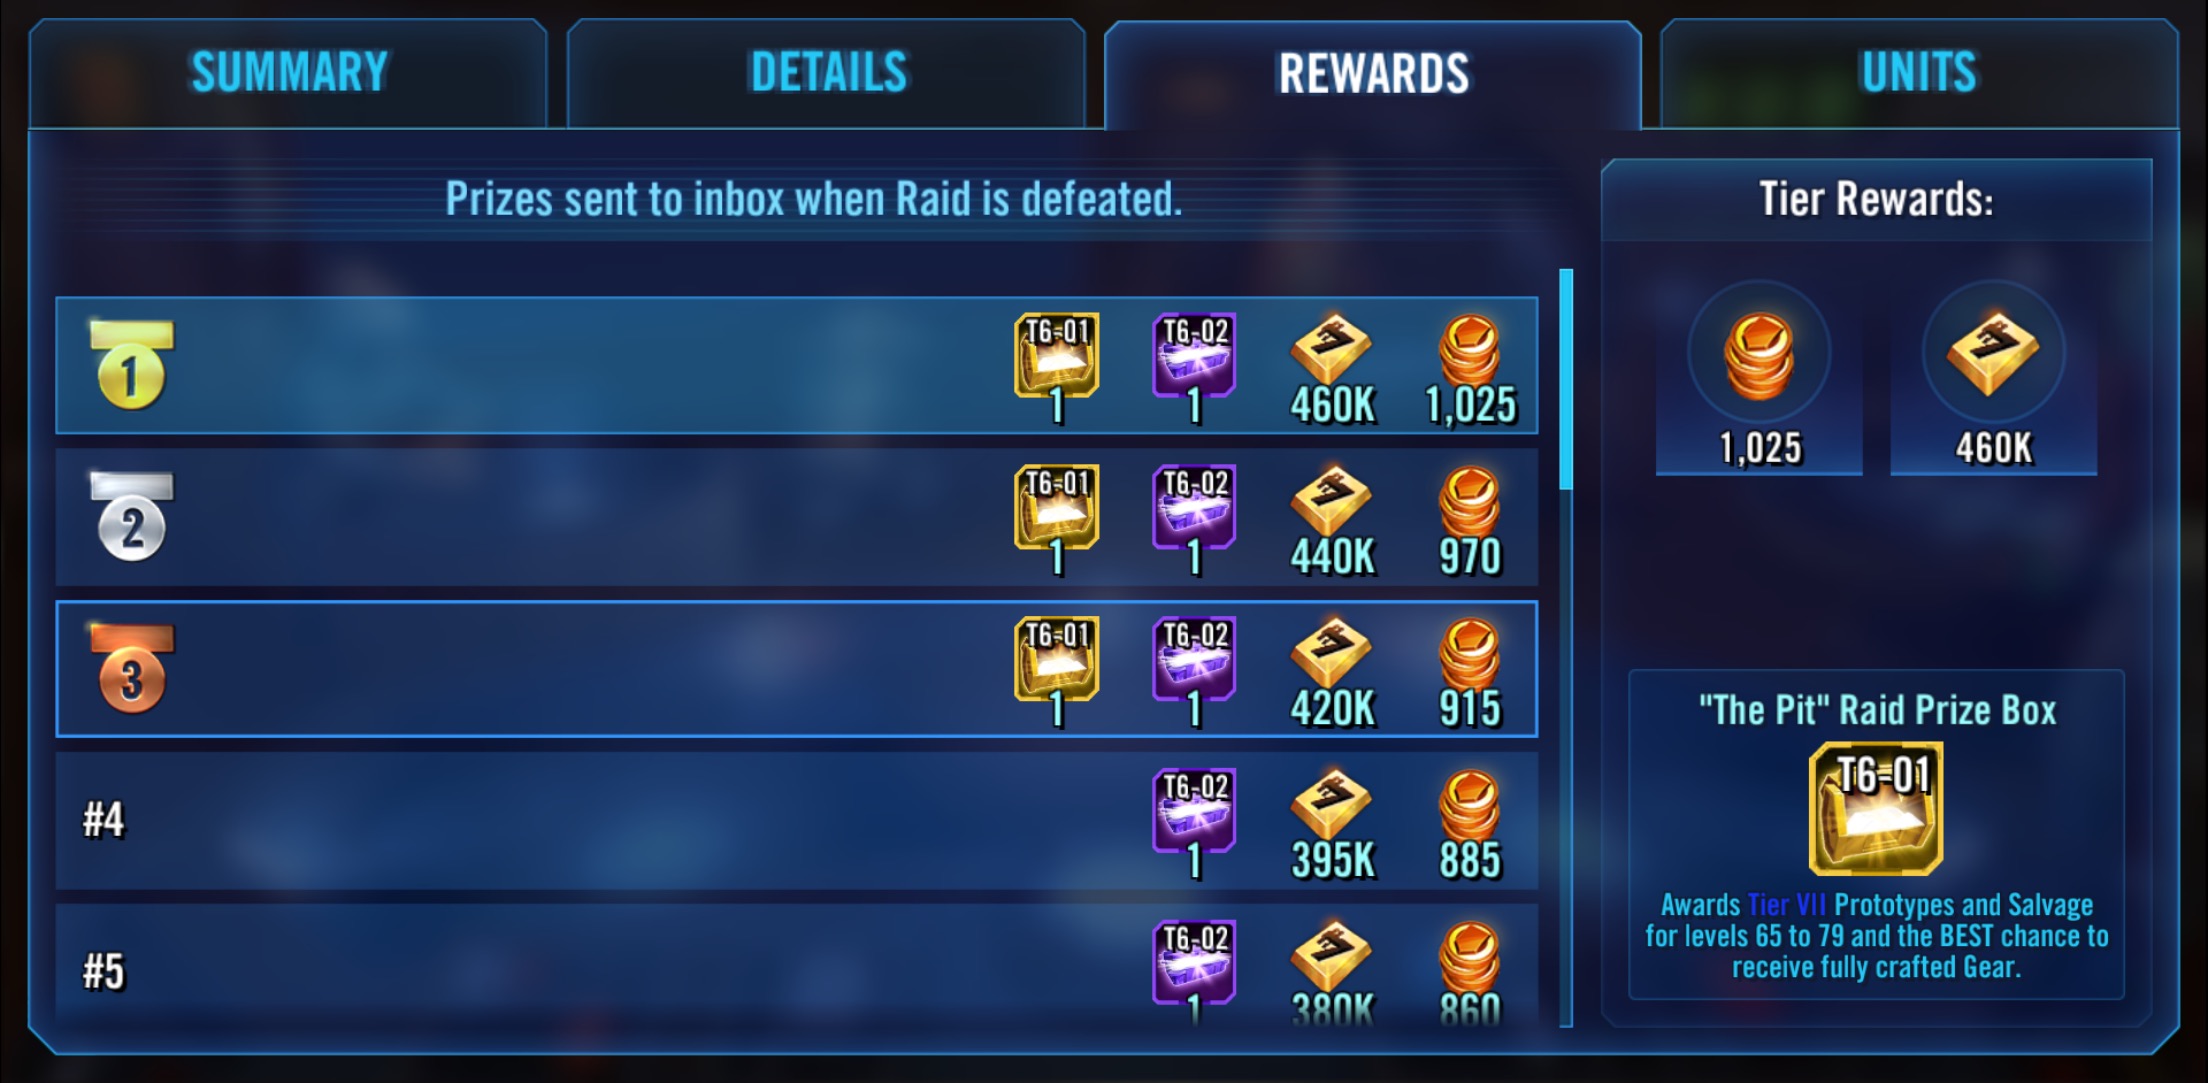
The Tier of the raid also impacts the rewards everyone gets at the end.
Once the raid is started, everyone that has the required units can participate. You get 5 attacks per day; just like in Galactic War, characters that die in one attack cannot be used in subsequent attacks - until it resets every 24h.
Also just like in Galactic War, if you retreat, all the damage you had dealt is erased and all the damage done to your characters is erased, as though you'd never initiated the battle.
Unlike Galactic War, RNG does not persist between attempts against the Rancor; if you get really bad luck, you can retreat and try again and you might get better luck.
In the battle, your goal is straightforward:
do as much damage to the central opponent as possible before your guys die or are forced to escape. After your guys die or retreat, the screen will say "Defeat!" but all the damage you've dealt to the Rancor will be applied permanently.
Escape?

Escape is different from retreat: during a raid, all of your characters gain an extra ability called Escape, which, if successful, removes that character from the current attack, but saves their health, turn meter, and cooldowns, and allows them to participate in another attack that same day. The Escape ability has a long cooldown, and starts cooled down, so you can't start a fight and escape immediately; it's also not guaranteed to succeed (chance of success decreases, the higher the Tier of the raid) and if it fails, you'll have to wait for the Escape ability to cool down again. It is primarily useful when you only have a few characters that are good against the Rancor, and the Rancor is about to Enrage and murder your guys; if you can pull them out in time, you can launch a fresh attack with 15 more turns before Enrage.
Raid Phases
Each raid is divided into 4 different phases (like the different stages of a boss fight, in many other video games); depending on which phase your raid is currently in, you will want to use different strategies. Each phase has millions of hit points, so you're not likely to go through multiple phases in one attack by yourself, but if you do (say you started your attack near the end of one phase) you'll just transition smoothly into the next phase with the same squad you were using. Each phase also has a kind of turn limit, which isn't set in stone, but instead works like this: after the main enemy has gone 15 times, the enemies will become Enraged, and start dealing massive damage (basically one-shotting all your guys), which ends the fight pretty fast. I'll talk about what's different about each phase below and suggest how to maximize your damage.
Phase 1: The Captain
Phase 1 is the most complicated section of the fight, with the most different things going on. It is also the stage where you can rack up the most damage, if you know what you're doing. In this stage, you're not fighting the actual Rancor yet; you're fighting a Gamorrean Captain, and his two sidekicks that he can periodically summon and re-summon. Important to note: only damage against the Captain himself actually counts as raid damage, damage against his sidekicks is not counted towards the total damage you've dealt to the raid.
The Captain has the following moves:
Mighty Thrust: Deal Physical damage to target enemy, plus bonus damage equal to 20% of their Max Health. If the target had 50% Health or more, also call an ally to Assist. This attack can't be Evaded. - This is the Captain's basic attack. Hits pretty hard, can't be dodged, but he generally will only do it when he can't use any of his other moves (either because they're on cooldown or because he wouldn't get any benefit from it).
Rally the Guards: Call all Gamorrean allies to Assist, then summon up to two Gamorrean allies to the battle. - He will rarely use this for the assist: most of the time he will use this to summon new guards, assuming you've killed at least 1 guard since the last time he used it.
Bestial Roar: He and his guards gain 30% Turn Meter and Offense Up for 3 turns, and his guards recover 30% of their Max Health. - The Captain will typically use this move on his next turn after he summons the guards with Rally the Guards.
Kill Order: Puts the "Deathmark" debuff on one enemy for five of that enemy's turns. This debuff can't be resisted, but can be removed. (Deathmarked targets must be attacked if able, and whenever they are damaged by an attack, they take bonus damage equal to 50% of their Max Health. If the target is defeated while still Deathmarked, they can't be Revived.) - Kill order and Deathmark do pretty much just what they say they do - if you can't get rid of the Deathmark, or protect the Deathmarked target somehow1, the Deathmarked target is going to die, and fast.
by taunting with someone else, for example, which will cause the Gamorreans to attack the taunter instead. If your taunter taunts before the captain uses Deathmark, then the Captain will probably just Deathmark your taunter, so the timing can be tricky. ↩
Like the Rancor will be in later phases, the Captain gets 5% turn meter every time he takes damage, and he's immune to Stun, Ability Block, Health Down, Cooldown increases, and massive damage effects (such as Savage Opress's instant-kill on enemies below 25% health). The other guards he summons are, quite importantly, not immune to any of these things.
Now he periodically summons two guards, technically one is called Gamorrean Brute and the other one's called Gamorrean Guard, but for simplicity's sake, we'll call them Right Guard (the guard to the right of the Captain, as you're looking at him) and Left Guard (the guy on the left).
The turn after Right Guard is summoned, he will taunt, gaining Defense up and 70% turn meter. On his next attack, he can inflict Buff Immunity and Ability Block for 2 turns; on his subsequent attacks he'll have a chance to inflict Healing Immunity. After a few turns, if he's not dead, he'll start the whole cycle over again.
Left Guard doesn't taunt the first turn he's summoned, instead on his first turn he'll do an attack that causes Expose (Expose is a debuff that means the next attack that hits the exposed target will do extra damage equal to 20% of the target's health). The turn after that, he'll taunt, and gain Retribution (a buff that means he counterattacks). After that he switches to his basic attack, which he will also use when he counterattacks, which applies up to 2 DoTs when he hits.
It's a lot to take in, but basically: the Captain will summon two guards; the one on the right will taunt to protect the captain, then the one on the left will taunt to protect the captain, and meanwhile the captain will buff and heal them, and mark one of your guys for death. If you lose track of who is about to do what, you can check the cooldown status of their skills by selecting the enemy you want to know about as a target, then looking up in the top right corner of the screen.
Phase 1 Strategy
So how do we deal with all that? Well, a lot of Phase 1 is having the right characters for the job, but the basic strategy is:
Prevent the Captain from taking turns by slowing him down and removing his turn meter as much as possible. This keeps him from doing bad stuff, and it also gives our team more turns before the Captain becomes Enraged and starts one-shotting everyone.
- Applying Speed Down and removing turn meter is basically the secret to success in every phase of the raid. Teebo is the king of turn meter removal (a maxed out Teebo can reset an enemy back to 0% turn meter with his basic attack, when he's in stealth mode, and will be in stealth mode >55% of the time if he is the squad leader) but there are plenty of other characters who can help with that - Chewie, Ewok Scout, Tusken Raider, Storm Trooper Han, Qui-Gon Jinn once he's level 76+, and probably some others I'm forgetting. For applying Speed Down, the two most popular options are CT-5555 "Fives" and Captain Phasma.
Get rid of Deathmark as soon as it's applied. For this you need someone with a move that removes your team's debuffs. The three popular options here are CT-7567 "Rex", Admiral Ackbar, and Ewok Elder. Rex is probably the best of the three, but he's currently P2W only. Ackbar is a solid option, but he really shines as leader of a Rebel team; Ewok Elder is a long and tedious farm to acquire, but worth it, IMO, because where Ackbar synergizes with Rebels, Elder synergizes with Ewoks, such as Teebo and Ewok Scout (see step 1). There are other characters who can remove debuffs, but they aren't generally as good: Barriss has a 40% chance to remove debuffs from Jedi at the end of her turn, which is too unreliable to count on (and doesn't help non-Jedi); Lobot removes debuffs, but isn't very good otherwise and is very hard to farm.
Deal with the guards, somehow. There are two basic methods of dealing with the guards:
- dispel their taunts, and ignore them. There are a few characters who can remove buffs from an enemy, but two popular choices are Teebo (see Step 1) and Qui-Gon Jinn. If you dispel the guards' taunts, and have a tank character who can absorb the damage from the guards, you can ignore them and go back to beating up the Captain.
- kill them quickly, and go back to beating up the Captain before he summons more. This option requires a less specialized squad, but if you have a couple strong damage dealers (Geonosian Soldier, Rey, IG-86, Lando, Leia, folks like that), you should be able to kill both guards before the Captain is able to summon replacements. Then you can beat him up until he summons more, then kill them and repeat.
- it's also possible to do a hybrid strategy - if, for example, you can only dispel one taunt, you can kill one guard, ignore the other one, and beat up the captain. If you're going to do this, it's important to kill Right Guard and dispel the taunt from Left Guard, because even though Right Guard taunts first, Left Guard is the one who counterattacks when he's taunting, and will dish out a lot more damage to your guys.
If you don't have any of the characters I mentioned for Step 1 and Step 2, this stage of the raid probably won't be one where you can deal a lot of damage.
If you do have the characters needed, you can deal a ton of damage and potentially even solo the entire phase.
Phase 2: Meet the Rancor
The good news: no guards to worry about, nothing standing between you and your target.
The bad news: your target is big, brown, ugly, hungry, and mean.
The Rancor has the following moves:
Crushing Claw: Deals Physical damage to target enemy with a 50% chance to inflict Healing Immunity for 2 turns and a 50% chance to Stun for 1 turn. This Stun chance is doubled if the target has less than 50% Health. This ability deals 30% less damage to Taunting targets. - his basic attack. Hits pretty hard (unless against a taunting target), can mess you up. He will only do this if he hasn't got anything better to do.
Rancor Slam: Deal Physical damage to all enemies with a 35% chance to inflict Health Down for 2 turns. Then, Devour's cooldown is reduced by 1 for each enemy that is below 50% Health. This ability deals 30% less damage to Taunting targets. - His area attack. He will use this every time he can, as soon as he can, unless there's only 1 enemy left.
Bellow: The Rancor roars, Dispelling all positive status effects from all enemies, and removing 75% Turn Meter from each enemy that did not have a positive status effect. - On the bright side, it doesn't deal any damage, which means you'll practically be looking forward to it. The Rancor will not use this move unless there is at least one buff on somebody for him to dispel; if you have a buff you want to last for several turns (like a Taunt!) you need to sucker him into using this first, by putting up some other buff(s), and then taunt while this skill is on cooldown.
Devour: Instantly kills an enemy. This ability can't be Evaded, and the defeated target can't be Revived. This ability is on cooldown when the phase begins. - yeah this is bad news. You have a 15-turn clock before the Rancor gets enraged, but only a 6-turn clock before he eats someone. He will use this skill as soon as it cools down, unless both Slam and Bellow are both cooled down as well and he wants to use them both as well, in which case he Slam and Bellow (or Bellow and Slam) and then eat someone the next turn. If your tank is taunting, he will eat the tank; if nobody is taunting, he will eat someone, who he eats is mostly random but he seems to show some preference for eating characters that still have a lot of health left.
Like the Captain, the Rancor is immune to Stun, Ability Block, Health Down, Cooldown increases, and massive damage effects, gains 5% turn meter whenever it gets hurt, and this turn meter gain cannot be prevented. Like enemy bosses in MAA, the Rancor takes two moves in a row whenever its turn comes up. In this phase, the Rancor gets +50% armor when it's not suffering any debuffs, which means you will deal more damage (not 50% more, but around 20% more) if you can keep it suffering from some kind of debuff.
You can see the current cooldown status of the Rancor's moves in the top right of the screen, when the Rancor is selected as a target. Keep an eye on Devour!
The Door Switch - you'll notice there's also something else with a health bar that you can attack, in this phase. The door switch is actually more of an ally than an enemy: killing it will cause the door to slam down on the Rancor. This doesn't kill the Rancor, but it does "topple" the Rancor. When the Rancor gets toppled, its turn meter goes to 0%, it stops gaining turn meter from getting hit, and it can no longer have turn meter removed; it also gets -50% tenacity (so it won't resist debuffs very well at all) and your entire team gets buffs"
Morale I: All attacking units gain 100% Critical Chance. (Guaranteed crits!)
Morale II: If the Rancor has 50% Health or less in its current phase, all attacking units gain +25% Speed.
Morale III: All attacking units that have more than 50% Health when the Rancor becomes Toppled gain 50% Offense.
You can deal a ton of damage to the Rancor when the door is down. Eventually, the Rancor will get full turn meter again, and on its next turn it will only stand back up, which returns everything to normal. The Door Switch won't come back right away - its blue Turn Meter bar will slowly fill up, and when it finally fills up, the Door Switch will come back to life at full health and you can kill it and bring the door down again.
Rancor Strategy
Just like with Phase 1, the most helpful step is:
Prevent the Rancor from taking turns by slowing him down and removing his turn meter as much as possible. Again, this prevents the Rancor from eating your guys (for a while) and also buys more time before he becomes Enraged and starts killing everyone (one Slam from an enraged Rancor can wipe out your entire team). Same basics apply: Teebo and other turn meter removers remove the Rancor's turn meter, and Phasma or Fives applies Speed Down, and everybody else just pounds on the Rancor as hard as possible. The Rancor has a much higher Tenacity than the Captain, and is more likely to resist Turn Meter removal or debuffs; you can offset this with a high Potency on the character applying the debuff or removing the turn meter.
Keep the Rancor debuffed! This helps keep your damage up but isn't really critical. Speed Down is obviously the most helpful debuff, but any other characters which apply debuffs are helpful in this stage. Remember the Rancor's immune to a bunch of debuffs, though.
Use the door wisely. You can deal a lot of damage while the door is down, and you also buy yourself a couple turns of the Rancor doing nothing. In general, your two best options are, drop the door early, hit the Rancor, and then try to last long enough to drop the door a second time before the fight ends; OR, drop the door right before the Rancor is about to devour someone, to buy yourself a couple of extra turns before that person gets eaten. It's important to note that the door switch's turn meter and health persist between attacks; if it's dead at the end of one fight, you'll still have to wait for it to come back at the beginning of the next fight. Depending on the specifics of your squads, you'll have to experiment a little to see what works best for you.
The Rancor can't have turn meter removed while the door is down (to prevent us from just keeping it trapped under the door forever and annihilating it) but Speed Down will make it take longer before the Rancor stands back up, so it's very helpful to make sure you've got Speed Down applied before you drop the door or shortly after the door comes down.
Phase 3: More of the same
Phase 3 is mostly the same as Phase 2. The main differences are, the Rancor no longer gets +50% armor when it's not debuffed - instead, when your guys are debuffed, they will deal half damage. This makes those debuff removers that you should remember from Phase 1, Ackbar, Rex, and Ewok Elder, are helpful here, though not as critical as they were for Phase 1; meanwhile, people you were bringing along for their debuffing capabilities, unless it's Speed Down, aren't as helpful here.
Other than that, the Rancor is a little stronger and has a bit higher Tenacity, so it's the same thing as Phase 2, just a bit harder.
Phase 4
Now you've gone and made him mad
The good news: in Phase 4, you don't have to worry about debuffing the Rancor, or getting rid of the debuffs from your guys. Better still, the Rancor's not hungry anymore, so it doesn't have the insta-kill Devour move!
Phase 4 instead of hungry, the Rancor is angry. It is twice as fast, the cooldowns for Slam and Bellow go down twice as fast, it hits a whole lot harder, and its Tenacity is a whole lot higher. Also, the Rancor smashed the door switch completely and emerged out past the door, so there's no more dropping the door on it to slow it down.
There's not much strategy to this phase that we haven't already covered. Slowing the rancor down and removing turn meter has never been more important, but also never been more likely to be resisted. Other than that, throw as much damage at the Rancor as you can, and expect a lot of short, brutal fights.
So what's so special about Tier 7?
Tier 7, also called Heroic, is a bit different than the other modes. In this mode, the Guard Captain and Rancor actually have a lot less health than Tier 6. (At Tier 6, the Captain has ~6 million hit points, Phase 2 and 3 are ~10 million hit points each, and Phase 4 is ~6 million; for Tier 7 each phase is only around 30% as many hit points.) However, the enemy's damage and stats are higher, the raid has a time limit to complete, and instead of getting 5 attacks per day, each person only gets 5 attacks, period. Because of this, you shouldn't even attempt Tier 7 until your guild has got Tier 6 pretty easily under control.
The benefit of doing Tier 7 raids is, even though it's much harder, the rewards are better, and everyone will get some character shards for Han Solo. (Not the Storm Trooper Han, the regular Han Solo.) Currently this is the only way to get Han Solo shards.
Victory!
After your guild finally finishes Phase 4, the game will take an hour to calculate the rewards and rankings, and then your rewards should show up in a message in your inbox for you to claim